CM1500: Upgrading by Adding an Additional Blower
Even though the Cool Machine brand is innovating the insulation machine market, the machines are quite amazingly simple. You can upgrade, replace and maintain major components of these machines without sending them to a service center. That is our goal. We want you to be able to upgrade, fix and maintain your machine with minimal down-time and frustration. Besides, you can save a lot of money!
Adding an additional blower will require between 1-2 hours and is moderately-easy to do. This overview article and attending video will show you the steps involved in adding a blower. If you purchase an upgrade kit, complete, detailed instructions will come with the kit.
Why you will want/need an additional blower
In another article, we discuss the reasons why an additional blower is necessary. Simply, you will need an additional blower to keep production rates up if you go over 150′ of hose. You will also need an additional blower if you do spray applications (cellulose wall spray, commercial glue spray).
What you get with a blower upgrade kit
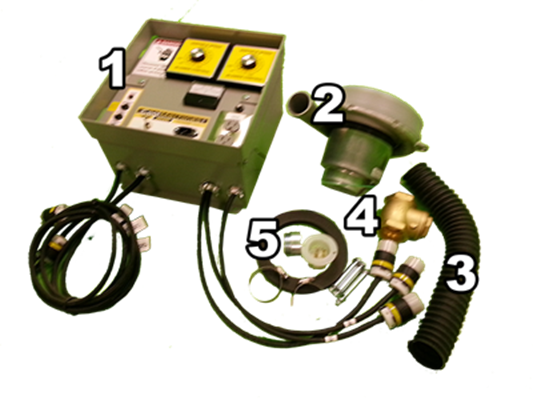
The upgrade kit’s main components include a 13 amp blower, circuit box, plug, valve and hose. Along with the kit are all of the necessary connectors and seals. After you install the new panel circuit box, you are able to return the used box for a $250 rebate.
- Reconditioned Circuit Panel Box: This is a pre-wired, plug and play box with an additional variable speed control
- 13 amp blower or 9 amp blower option. [1. 13amp requires one 20 amp input and one 15 amp input | 9 amp requires two 15 amp inputs]
- Blower hose: connects blower to airlock.
- Brass air control valve.
- Various accessories: foam blower motor seal, hose slip to attach to air control valve, blower mounting screws, hose clamps and additional power socket.
Overview of Steps required to install the additional blower
- Remove panel box. To reach the box and make it easier to upgrade the CM1500, remove the hopper. You can remove the four small bolts that secure the circuit panel by reaching in from the bottom of the removed hopper.
- Remove bottom protection bracket. The base of the CM1500 has a protective shield that needs to be removed. That is all! It is that easy to access the blower box by removing four simple screws.
- Assemble valve and install inside blower box. You will receive a brass valve (4) and a steel hose slip (among items in 5). The slip is installed on the opposite end of the brass valve. Notice the direction of the arrow and placement of this slip in the video. It is very important that you install this on the correct end since the valve controls the direction of air flow. When installing the valve in the blower box, you will rotate the valve until the socketed end is pointed in the “up” position.
- Install foam ring. This video shows how the foam ring is glued. You will want to glue only one side of the foam ring. If you glue both sides and need to replace the blower in the future, you will find yourself scraping this ring off. Just make a simple template out of cardboard which fits inside the ring. Use a ¾” bolt head in the center of the disc to help you place the foam ring easily. Give this foam ring a few minutes to adhere.
- Install blower. The blower only requires three bolts to install.
- Install plug and attach green wire from blower to green post. Attach the remaining wires to the other posts. There is no particular post that is right or wrong.
- Install the hose. The hose seems to be too long. However, do not trim or cut this hose, it is far easier to attach to the valve and blower with the pre-cut length.
- Place the new panel box on the hopper. Make sure you transfer the remote control cord hanger from the old panel box to the new.
- Replace bottom protection bracket.
Video of an installation of an additional blower
In the shop, this installation took 45 minutes. Being that it may be your first time, the time may take longer. This is not a very complicated upgrade. Watch the video below to see the process in less than 3 minutes:


